How to Rig a Slip Bobber
Ever found yourself struggling to present your bait at just the right depth in Michigan's deep lakes, or battling with fixed bobbers that simply won't let you cast far enough? It's a common frustration, especially when those fish are holding in deeper water or staying out of reach. This comprehensive guide will walk you through everything you need to know about how to rig a slip bobber, transforming your angling experience and helping you precisely target fish in a variety of Michigan waters.
Why Slip Bobbers Are a Game-Changer for Michigan Anglers
Many anglers, myself included, started with those simple red-and-white clip-on bobbers. They're fantastic for shallow water, don't get me wrong, but as soon as you want to fish deeper than your rod length, or cast a significant distance, they become a real pain. That's where slip bobbers come into their own. They offer incredible versatility and precision, allowing you to present your bait exactly where the fish are hiding, whether that's 5 feet down or 25 feet down.
The Problem with Fixed Bobbers in Deeper Water
Imagine you're out on Houghton Lake, one of Michigan's largest inland lakes, and you've marked a school of hungry walleye suspended 15 feet down. If you're using a fixed bobber, you'd need a 15-foot leader below it. Trying to cast a rig like that with a standard 6-7 foot fishing rod is an absolute nightmare. Your hook gets tangled in the rod tip, your bait snags on the boat, and the whole process is more frustrating than it is enjoyable. You end up making short, awkward casts, and the fish just stay out of reach. It's a fundamental limitation that keeps many anglers from reaching their full potential, especially when targeting species that prefer deeper haunts.
Precision and Versatility: The Slip Bobber Advantage
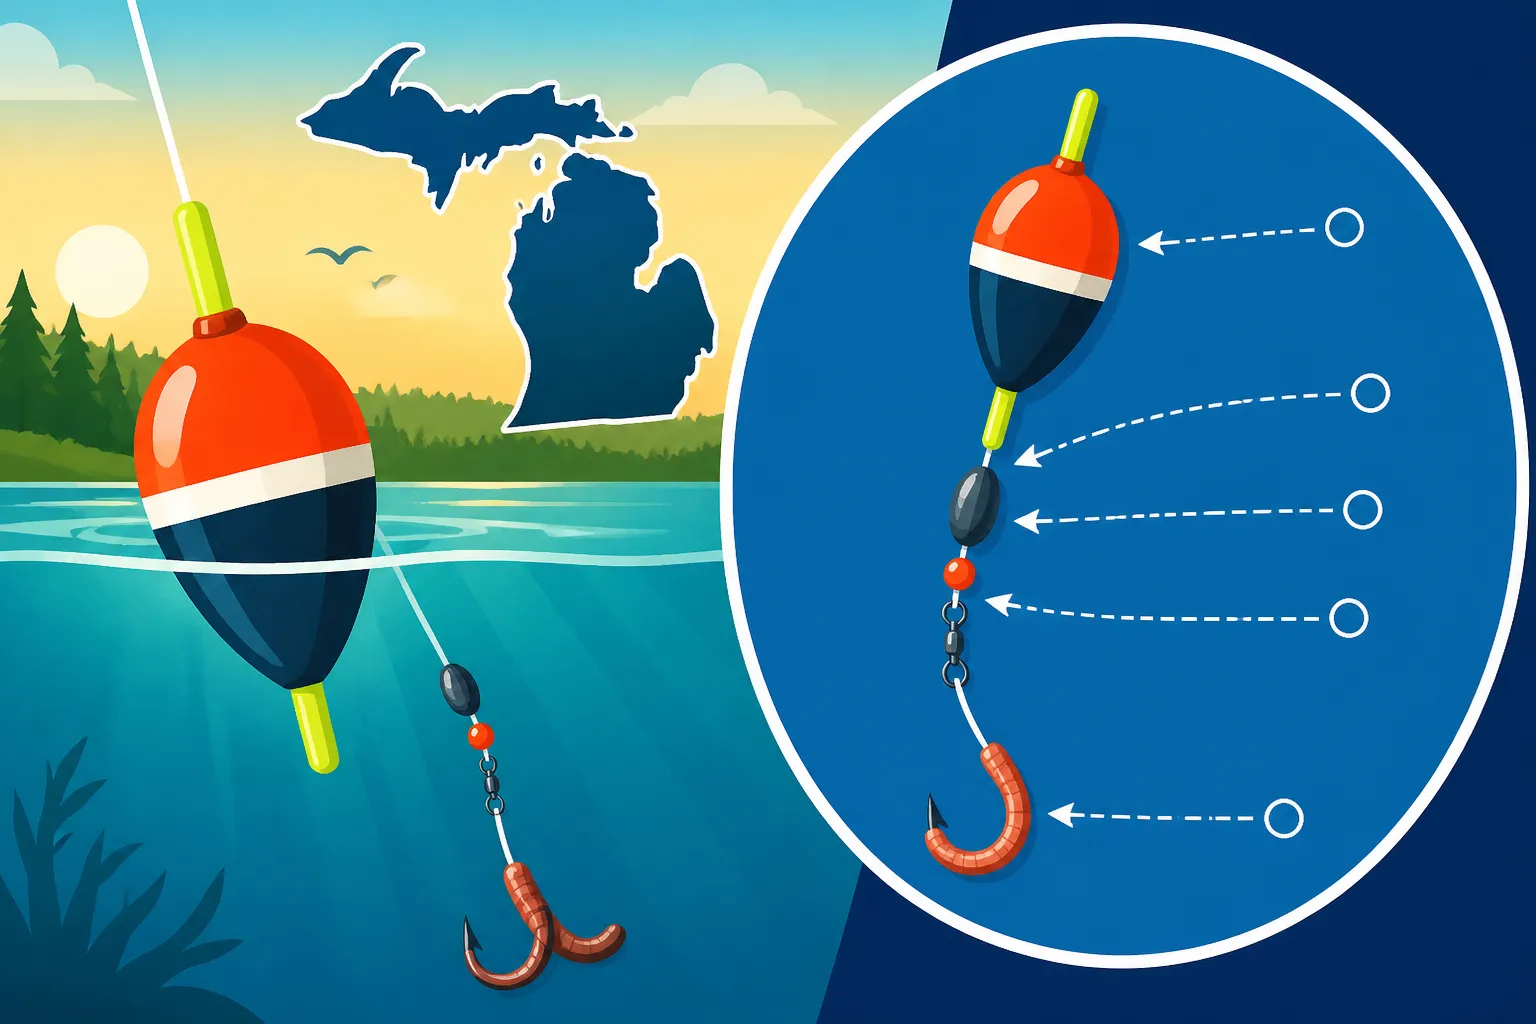
A slip bobber, however, slides freely up and down your fishing line. The key is a small bobber stop knot that you place on your line above the bobber. This knot is small enough to pass easily through your rod guides when you cast, allowing you to reel the bobber right down to your hook. Once cast, the weight of your bait and sinker pulls the line through the bobber until it hits that stop knot, setting your bait at the perfect predetermined depth. This means you can cast much further and fish much deeper with ease. It's truly revolutionary for getting your offering into the strike zone, whether you're chasing yellow perch in Lake St. Clair or crappie in a quiet inland lake. The ability to adjust your depth in seconds, without retying anything, also makes it incredibly versatile for scouting different depths when the fish are finicky.
Essential Gear for Your Slip Bobber Rig
Before you start rigging, it's crucial to gather the right components. While the basic idea is simple, having the correct gear can make a huge difference in your success and enjoyment on the water. Think about what you're targeting and where you're fishing in Michigan to best tailor your setup.
The Right Rod and Reel Setup
For slip bobber fishing, a medium-light to medium-action spinning rod, typically 6 to 7.5 feet long, is a fantastic all-around choice. This length gives you good casting distance and enough backbone to handle decent-sized fish, while still being sensitive enough to detect subtle bites. A longer rod, say 8 to 9 feet, can be even better for longer casts from shore or for greater line pickup when setting the hook, especially if you're targeting species like walleye or larger bass. Pair this with a reliable spinning reel in the 2000 to 3000 size range, spooled with appropriate line. You don't need anything super heavy-duty unless you're specifically targeting Michigan's trophy muskellunge, which would likely require a much heavier setup anyway. For most panfish and walleye applications, this setup will serve you well. Best Rods and Reels for Michigan Fishing is a great resource if you're looking to upgrade your general setup.
Selecting Your Fishing Line
When it comes to line, you have a few good options for slip bobber fishing:
- Monofilament (Mono): This is a classic choice for a reason. Its stretch acts as a shock absorber, helping to prevent hooks from pulling out when a fish surges. It's also typically very easy to tie knots with, and its buoyancy helps keep your bobber floating naturally. For many situations, 6-10 pound test monofilament is ideal.
- Fluorocarbon (Fluoro): While often used as a leader due to its near invisibility underwater, some anglers spool their reels entirely with fluorocarbon. It has less stretch than mono, offering increased sensitivity, but its higher density means it sinks, which can sometimes pull your bobber slightly lower or affect its drift. It's also generally more expensive.
- Braided Line: Braided line has virtually no stretch, providing maximum sensitivity and incredible strength-to-diameter ratio. This is fantastic for feeling those light bites and getting solid hooksets. However, braided line is highly visible, so you'll almost always want to use a fluorocarbon or monofilament leader with it, attached with a strong knot like a FG knot or double uni-knot. Also, due to its slickness, special care needs to be taken when tying bobber stops, as they can slip on braid more easily than on mono.
For most slip bobber setups in Michigan, I'd recommend sticking with 6-8 pound test monofilament as your main line, or using 10-20 pound braid with a 6-10 pound fluorocarbon leader.
The Slip Bobber Itself
Slip bobbers come in various shapes and sizes. The key is to match the size of your bobber to the weight of your bait and sinker. You want your bobber to be buoyant enough to float, but not so large that it takes a huge amount of weight to get it to sit properly. A good rule of thumb is that the bobber should stand upright in the water, with only a small portion showing, when your bait and sinker are suspended. This makes it sensitive to even the lightest bites. Common styles include cigar-shaped, balsa, or even weighted ones that cast like a dream. Many tackle shops, including larger retailers like Bass Pro Shops, will have a wide selection to choose from.
Bobber Stops, Weights, and Hooks
These small but mighty components are what bring the slip bobber rig together:
- Bobber Stops: These are crucial. They're typically small pieces of string, rubber, or plastic that cinch down on your main line. The string bobber stops are my personal favorite because they cinch down tightly, are adjustable, and pass through rod guides easily. You can often buy them pre-tied with a small plastic straw for easy application. Look for these at any reputable tackle store or online retailer like Amazon.
- Weights (Split Shot or Bullet Sinkers): You need enough weight to get your bait down to your desired depth and to make your bobber sit correctly. Start with a few small split shot weights crimped just above your swivel or leader. If you need more weight for casting distance or current, a small bullet sinker can be added above your swivel. The goal is just enough weight to get your rig down without making it plummet like a stone.
- Swivels: A small barrel swivel (size 10-14) is a great addition. It prevents line twist, which can be a real headache, and acts as a connection point between your main line (with the bobber and stop) and your leader.
- Hooks: The type and size of hook depend entirely on what you're trying to catch and what bait you're using. For panfish like bluegill and crappie, a small #6 or #8 Aberdeen or fine wire hook is perfect. For walleye, a #4 or #2 octopus hook or a jig head might be more appropriate. Always make sure your hook is sharp! Best Bobber Setup for Panfish provides more detail on hooks for those smaller species.
Step-by-Step Guide to Rigging Your Slip Bobber
Now that you have all your gear, let's get down to the nitty-gritty of putting it all together. It's a straightforward process, but paying attention to the details will ensure your rig performs flawlessly on the water.
Step 1: Attaching the Bobber Stop
This is where the magic begins. Take one of your bobber stops. If it's a string stop with a plastic sleeve, thread your main line through the sleeve. Then, slide the string knot off the sleeve and onto your main line. Pull both tag ends of the string knot firmly to cinch it down on your line. You can trim the tag ends, but leave about a quarter-inch so you can adjust it later if needed. The beauty of this knot is that it's small enough to pass through your rod guides when you cast, yet strong enough to stop your bobber. For braid, sometimes a double bobber stop or a special rubber stop designed for braid is necessary to prevent slippage.
Step 2: Threading the Slip Bobber
Next, slide your slip bobber onto your main line. Most slip bobbers have a small hole or a plastic sleeve that runs through the center. Simply feed your main line through this hole. Make sure it slides freely! If it snags, you might have an issue with the bobber or a kink in your line. This free movement is what makes the slip bobber concept work.
Step 3: Tying on Your Weight and Swivel
After the bobber, you'll want to add your weight. I prefer to use a small barrel swivel as a stopper for my weight. First, tie a small barrel swivel onto the end of your main line using a strong knot like a Palomar knot or an improved clinch knot. This swivel will prevent line twist, which is especially important if you're using live bait that spins. Then, crimp one or two small split shot weights about 6-12 inches above the swivel. Alternatively, you can slide a small bullet sinker onto your line above the swivel, allowing it to rest against the knot once tied. The weight should be heavy enough to pull your line through the bobber until it hits the bobber stop knot, but not so heavy that it creates an unnatural fall for your bait. The exact amount of weight depends on your bobber size, bait, and fishing conditions like current or wind.
Step 4: Adding Your Leader and Hook
Finally, attach a leader to the other end of your barrel swivel. Your leader should typically be made of monofilament or fluorocarbon, generally lighter in breaking strength than your main line. This is a deliberate choice: if you get snagged, you'll likely only break off your leader and hook, saving your main line, bobber, and bobber stop. A good starting length for your leader is 12-24 inches, but you can adjust this based on water clarity and how spooky the fish are. In clear Michigan waters, a longer fluorocarbon leader can be a real advantage. Tie your chosen hook to the end of the leader. When using live bait, ensure your hook is appropriately sized for both the bait and the target species. For example, if you're using a lively minnow for walleye, a larger, stronger hook is necessary compared to a tiny worm for bluegill.
| Component | Purpose | Key Considerations |
|---|---|---|
| Bobber Stop | Sets the fishing depth | Must pass through guides; secure on line (string preferred) |
| Slip Bobber | Indicates bites, suspends bait | Match size to weight; slides freely |
| Weights | Sinks bait, sets bobber posture | Enough to pull line, not too heavy; split shot or bullet |
| Swivel | Prevents line twist, connects main/leader | Small size (10-14); strong knot |
| Leader | Invisible presentation, break-off point | Fluorocarbon or mono; lighter test than main line |
| Hook | Catches the fish | Size and type matched to bait and target species |
Tips for Success and Common Slip Bobber Mistakes
Rigging a slip bobber is just the first step. To truly excel with this technique in Michigan's diverse waters, you need to understand how to use it effectively and avoid common pitfalls that can lead to frustration.
Adjusting Your Depth Like a Pro
The beauty of the slip bobber is its adjustable depth. Once your rig is in the water, watch your bobber closely. If it's lying flat on the surface, your bait hasn't reached the bobber stop, meaning it's either too shallow, or your weight isn't sufficient. If it's standing upright but barely showing, you've likely hit your mark. If it's completely submerged, you might have too much weight or you're snagged.
To adjust depth, simply slide the bobber stop knot up or down your main line. Move it up for deeper presentations, and down for shallower water. It's a good idea to start a bit shallower than you think the fish are, then gradually increase your depth until you start getting bites. This systematic approach allows you to quickly dial in the perfect depth. Don't be afraid to experiment! Fish often relate to specific depths, and sometimes being just a foot or two off can make all the difference. This is especially true when searching for walleye in the Detroit River or exploring different thermal layers for trout in Higgins Lake.
Choosing the Right Bait and Presentation
Slip bobbers are incredibly versatile when it comes to bait. They shine with live bait, like minnows, worms, or leeches, because they allow the bait to swim naturally at a specific depth. This makes them lethal for species like walleye, yellow perch, and even smallmouth bass. For example, a lively shiner minnow suspended beneath a slip bobber is a classic walleye killer. Best Live Bait for Michigan Walleye in Spring offers more specific advice.
However, don't limit yourself to live bait. Small jigs tipped with soft plastics, or even small spoons, can also be presented effectively under a slip bobber. The key is to choose a bait that has some inherent action or is light enough to be presented subtly, mimicking natural forage. Ensure your bait is hooked properly to allow for natural movement and to prevent it from spinning, which can twist your line.
Casting and Retrieval Techniques
When casting a slip bobber rig, make a smooth, controlled cast. Because the bobber is typically reeled down close to your terminal tackle, you avoid the tangles associated with long leaders. Once your rig hits the water, give a little slack so the weight can pull the line through the bobber until it hits the stop knot. Watch your bobber as it settles; it should stand upright if your depth and weight are correct.
For retrieval, a slow, steady retrieve can work, especially if you're trying to cover water or impart action to a jig. However, often the most effective retrieve is simply letting your bait sit, with occasional twitches of the rod tip to animate it. If you're fishing in current, like on the St. Clair River, letting the current carry your bobber and bait downstream can be incredibly effective, covering a lot of water and presenting your bait in a very natural way. How to Drift Fish for Steelhead also touches on using currents for bait presentation.
Common Mistakes to Avoid
Even seasoned anglers can make mistakes with slip bobbers. Here are a few to watch out for:
- Too Much Weight: If your bobber is constantly disappearing or sitting too low in the water, you likely have too much weight. This makes it less sensitive and can spook fish. Remove a split shot or use a lighter sinker.
- Not Enough Weight: If your bobber lies flat, your bait isn't getting down, or your bobber is too large for the amount of weight you're using. Add more weight until the bobber stands upright.
- Bobber Stop Slipping: This is often an issue with braided line. Ensure your bobber stop is tightly cinched. If using a string stop, you might need to wrap it around your main line an extra time before tying the knot or use two stops. Using rubber bobber stops designed for braid can also help.
- Leader Too Short or Too Long: A leader that's too short can make your bait look unnatural or cause the fish to see your main line. Too long, and it can be difficult to manage, especially when landing fish. Experiment to find the sweet spot, typically 12-36 inches.
- Ignoring Wind and Current: Wind and current can make your bobber drift significantly. Sometimes this is good, helping you cover water. Other times, it pulls your bait out of the strike zone. Use a slightly heavier bobber or adjust your weight to compensate if you need to keep your bait in a precise spot. If you're fishing a river like the Manistee, understanding the current is paramount.
By mastering the slip bobber, you'll open up a whole new world of fishing possibilities in Michigan, from targeting suspended crappie to precisely placing a minnow for wary walleye. It truly is a simple rig that delivers complex results, giving you an edge on almost any body of water.
Disclaimer
This article is for general informational purposes only and does not constitute professional advice. Laws, prices and regulations vary by location and change over time. Consult a qualified professional for guidance on your specific situation.